Should I change the name of this blog to carrats? No travel is "happening" anymore and since I cannot bring myself to blog about irrelevant details of my life or Saturday's night party, I'm filling it with maybe-less-irrelevant details about my one and only hobby left.
The
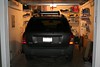
Jeep Grand Cherokee Laredo model year 2000 has been my daily driver since shortly after I arrived in Seattle in 2000, until I discovered stick-shift driving and the E30 3-series BMW a couple of years ago. Then, there was no looking back and the truck became my wife’s car. It’s still the vehicle I rely on when it snows, when we need to purchase anything larger than a bag of groceries, and when I have to take more than one passenger – since the 3-series was designed with the idea in mind that the people sitting in the rear did not have legs.
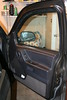
The passenger's side front door latch of the Jeep had been broken for years, making a shrill buzzing sound when engaged. The door could only be opened from the inside. Since I don't drive it anymore I neglected this car for a while, until my wife pointed that if I invest so much time in the old, sickly BMW I could at least fix her door.
The new latch was $78.43 (how do they come up with these numbers?...) plus $11.80 shipping on eBay. He deserved his positive rating. The guy (airparkcjd) had more than 4000 sales and 100% positive reviews.
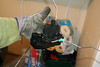
The Flickr set is arranged in chronological order. Click on the photos to see notes describing the location of various components referred in this article.
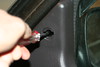
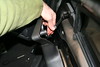
Pry out the cap that covers the screw hole on the mirror flag bezel. (I have no idea why that piece of plastic is called "mirror flag bezel". It sounds a bit pompous and redundant.
Remove the panel-holding screw with a Philips screwdriver.
Remove the sheet metal screw located in the door cupped handle. On a side note, this screw was fine, but on the rear door, the screw had rusted and when I tried the same procedure it wouldn't budge. I soaked it with PB Blaster penetrating catalyst but I still couldn't loosen it. I applied force with various screwdriver bits until I destroyed the head and I had to drill it out.
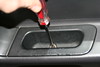
Remove the Torx screw behind the door handle.
Pull the edges of the door panel until the plastic retaining clips pop open. It's a good idea to have replacement clips, some may break when the panel is removed.
Unhook the mirror electrical connector.
Release the two main door latch rods from the inner handle mechanism. The plastic clips on the handle must be pushed hard to release the latch rods. Your fingertips will hurt.
Remove the main electrical connector from the door panel. Before you remove it, make sure the window is all the way up.
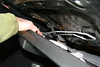
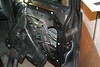
A quick look at the underbelly of the beast…
Pull out the moisture dam and expose the latch rods. The dam is held in place by a slimy, sticky substance. It will re-attach with a bit of pressure.
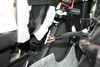
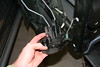
Disconnect the inner latch rod from the external door handle mechanism. While it wasn’t that hard to get in there with the fingers and pry open the retaining clip, it was a total pain to take a picture of it because my lens can't focus under 2 feet. The clip is the little yellow spot at the top. It's the same kind of clip like all the others.
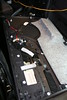
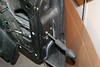
Unscrew the three Torx bolts that hold the latch to the door. At that point I realized I didn't have the right size Torx bit for those screws so I used a hex head and it worked nonetheless. Off to O'Reilly's to add one more set of screwdriver bits to my arsenal!
Remove the latch assembly and disconnect the electrical connector.
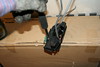
They look like evil metal bugs from outer space. The new latch (on the right) didn't come with the protective cover that the old one had, so I decided to reuse it.
Remove the single retaining screw that holds the cover to the latch, pry out the plastic cover and install it on the new latch.
Ready for installation! Installation is the reverse of removal. Don’t forget to attach all connectors and latch rod ends before pressing the panel back into the door clips.


2 comments:
I like the information and how it's presented. Jeep Grand Cherokee door latch replacement instructions are simple and I can follow them to make my Jeep work better anytime. Impressive.
Jeep Suspension Lift Kits
I really enjoyed reading this article, and found it quite informative. And especially the part about the popularity of the door latches. Thanks for sharing! I generally prefer door latches to door latches and would recommend it to all.
Post a Comment