This is not a travel post, it's a car post.
In my crusade to fix, upgrade and polish the old piece of junk (1988 BMW 325) I finally decided to tackle the rear axle suspension, which had felt horribly loose for a while. Moreover I kept hearing squeaking and screeching noises coming from the left side of the back of the car while driving.
Since my car is primarily a daily driver and will never see the track in its remaining days on earth I chose to upgrade the suspension with Bilstein Sport shock absorbers and H&R OE Sport springs. This combination is supposed to lower the car but not too much - about one inch - and the ride won’t become too harsh as it would be the case with stiffer lowering springs.
Parts and tools:
- Bilstein Sport shocks (rear)
- H&R OE Sport springs (rear)
- Shock mounts for the convertible model (sturdier design)
- Self-locking nuts for the shock mounts
- Shock mount gasket
- Reinforcement plates – didn’t fit
- Bunch of metric wrenches and sockets
- Floor jack and jack stands
- Blocks of wood tp put between the jack and body
- Working light
Click on images for better-resolution photos.
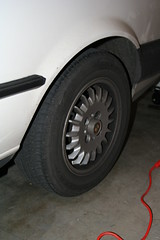
The rear wheel
before the procedure
Shocks, mounts, gaskets and reinforcement plates are from
Bavarian Autosport.
The springs came from a guy who runs a high-volume automotive store on eBay. He had the best price, including the shipping charges, but in retrospect he was a deceitful jerk since he had advertised his product as “in stock” but instead had to order it from H&R. Because of this delay the package arrived in Seattle right as the snow storm was settling in, and then got stuck in the local UPS service center for 12 days before it was finally delivered. But I digress.
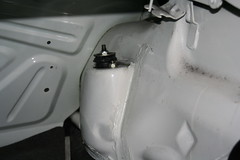
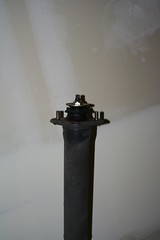
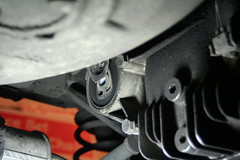
Right side shock mount
Left side shock mount, damaged
Start by raising the back of the car and put it on jack stands, of course. Remove the wheels.
Partially remove the trim in the trunk to expose the shock mounts. Bending the trim is not an easy affair; it’s relatively rigid and hard to peel off and snap out of the grooves where it’s tucked in. That’s when I noticed that the right side shock mount had to be broken – there was a 2-3 millimeter gap between the upper cupped washer and the rubber piece. What do you know!
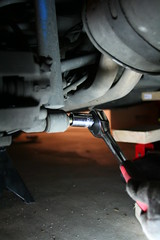
Remove shock mounting screw
Support the trailing arm
Disconnect the shock from its lower mount on the trailing arm. Not supported by the shock, the trailing arm will drop a couple of inches. Be sure to support it before removing the shock mounting screw; the Bentley indicates that the sudden jerk of the trailing arm may damage the CV joints. I forgot to support the left trailing arm when I disconnected the shock absorber and it dropped quite sharply. Fortunately it doesn’t seem to have broken anything, the car rolls fine now; the Bentley understandably errs on the side of caution. Of course, I can never be sure unless I inspect the joints. After disconnecting the shock I supported the trailing arm with the jack for most of the time, to avoid unnecessary pressure on the joints.
Loosen the two self-locking nuts that hold the shock mount to the frame. Supporting the shock from below, remove the mounting nuts and then the shock. In my case, if there had been a gasket between the shock and the car frame it has long ago turned into dust.
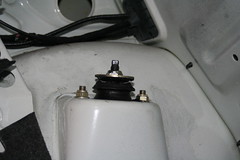
Broken left side shock mount
The right shock absorber looked worn out yet not too damaged, but the left one was downright broken. There is a metal tube which sits in the middle of the hard rubber at the center of the mount, that the shock absorber’s piston rod slides through. That tube was completely disconnected from the surrounding rubber. No wonder I had been hearing those noises coming from the rear left side of the car while driving! And no wonder that each time I went over a sudden bump in the road (like when the asphalt/concrete plates aren’t properly aligned, and the end of the current one is a bit lower than the beginning of the next) the whole back of the car felt like it was going to fall off.
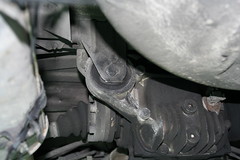
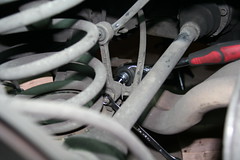
Lowered exhaust, supported with zip ties
Next, the spring had to be removed. This needed a little more work.
The Bentley says to disconnect and lower the rear part of the exhaust system from the brackets that support it, to allow for more room when the trailing arm is lowered. I did just that, but in retrospect I think this step didn’t help much. I supported the exhaust by hanging it with zip-ties from the upper brackets.
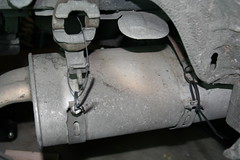
Final drive mounting nut and bracket
Disconnecting the final drive
Final drive lowered
Again, to make more room for the lowered trailing arm so that the spring can come out, I disconnected the final drive from its mount and pulled it down. It didn’t go too low and I didn’t want to force it. This didn’t seem to create any significant room for the trailing arm which was already lowered to the maximum anyway.
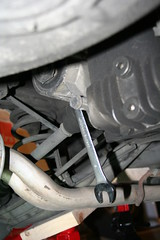
Disconnect the stabilizer bar link
Disconnect the stabilizer bar connecting link from the trailing arm. This seemed to lower the trailing arm a little bit more, but again, there was no significant help (the stabilizer bar is called “sway bar” by some).
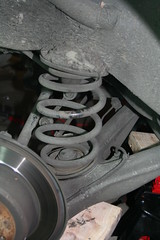
The old stock spring
ready to be removed
At this point the Bentley leads you to believe that the spring can be simply removed by hand, but I realized that any attempt in that direction was hoplessly futile since I didn’t have the necessary superhuman powers to compress the spring by my bare hands. With the trailing arm lowered to the max the spring was still compressed and the ends of the spring were snug against the rubber mounts. Moreover the top and bottom spring supports have conical protrusions that fit inside the spring and secure it in position. There’s no way that spring was coming out on persuasion alone.
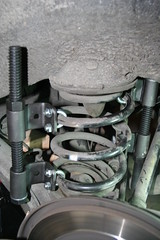
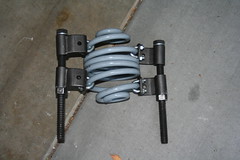
Spring with compressor on
I squeezed in my spring compressor, but this was no simple task. There isn’t enough space to easily wield a wrench in there. While one of the spring compressor rods can be attached on the outside of the spring inside the wheel cavity, thus offering better access, the other one has to go on the opposite side, and gets wedged between the axle and the exhaust (on the left side) making the task of tightening the compressor bolts extremely painful. It took quite a while and a lot of sweat.
New H&R Spring compressed
New and old springs side by side
After removing the old spring, I tried to put the new spring in without compression, thinking that maybe its shorter size would allow for it – but that initiative was doomed from the start as well, due to lack of superpowers. I compressed the H&R spring and installed it, after which - of course - I had to uncompress it in place, which takes an equally frustrating amount of time. Make no mistake: operating a spring compressor on mounted springs is hard work.
After the spring was finally in its cradle I installed the shock (reverse of removal). The two cupped washers on the old shock mount should be reused but everyone says the self-locking nuts should be used only once. I’m not sure why and didn’t bother investigating yet, so I got new nuts.
I had also ordered the reinforcement plates that were recommended by other people and by Bavauto. These metal plates are supposed to go inside the trunk between the body metal and the shock mount nuts, but they didn’t fit on my model. On one side of the body plate hole for the shock mount, the body plate has some sort of reinforcement bar which is about a quarter of an inch high. The shock reinforcement plate is too wide and goes over that bar; as a result, it doesn’t sit flat on the body and the lock nuts can’t be tightened against it. Useless!
The right side went easier due to the absence of the exhaust and the experience that I had already gathered by working on the left side. Finally, the car was ready to have its wheels back on and go out for a drive. However, as I was tightening the left-side shock mount to spec using a torque wrench, one of the threaded bolts broke in half and popped out with the nut on it. So close to victory, so close to showing off, so close to dinner! Damn it! Despair! Frustration! I didn’t want to keep the car lying useless on jack stands until I got a new mount so I installed the old right-side mount instead, which seemed to be still usable. On Monday I called Bavauto and they offered to send me a replacement shock mount at no cost. Great customer service! I hope it doesn’t get caught in the next snow storm...
After working on the rear suspension all Saturday I was planning to tackle the front the next day. But when I woke up I was in so much pain after the previous day-long workout that I had to schedule the front axle adventure for the next weekend.
Working Time - about 8 hours, with breaks. With more experience and better organization (the right tools always at hand, more space in the garage, etc) this could take significantly shorther, even for an amateur.
Difficulty - technically not too challenging, but it involves a lot of physical work.


5 comments:
na ca si-a schimbat fritz arcurile, telescoapele si bucsele care erau bulite si acum are un bimer mai sportlich :-)
putem discuta despre bmw la o berica in seattle in februarie, ce zici? :-)
mitru
Aber natuerlich!
Ce dreaku is alea "bucse"?
Hai noroc si sa ne vedem in curand!
Fritz
Bucsa - element de articulatie prezent in mai multe sisteme care asigura o asamblare rigid/flexibila intre doua elemente metalice.
Constructiv , bucsa se prezinta in mod comun sub forma de inele metalice in imbracaminte de cauciuc foarte dur.
mitru
Aha, bucsa = bushing (eng). De la Rîm ne tragem toti...
Thanks to share information about Coil Spring
Post a Comment